


For security reasons, password-based login at the console level (SSH / Shell) is disabled on our hosting servers; we rely exclusively on the public-key method for SSH authentication.
In this help article, we would like to explain how to generate and store an SSH key.
Important note: This article provides instructions on how to create and configure an SSH key for console-level (SSH / Shell) authentication on a Linux server. This key should be kept with the utmost care and must not be disclosed to third parties; it should be regarded as the front-door key to your system!
PuTTYgen - Simple SSH Key Generation
With PuTTYgen, you can generate your SSH key quickly and easily.
Download PuTTYgen
Windows - 32-bit: https://the.earth.li/~sgtatham/putty/latest/w32/puttygen.exe
Windows - 64-bit: https://the.earth.li/~sgtatham/putty/latest/w64/puttygen.exe
Generating an SSH key with PuTTYgen
Launch PuTTYgen; you will then see the start screen, which already contains all the key functions. Here is a screenshot:
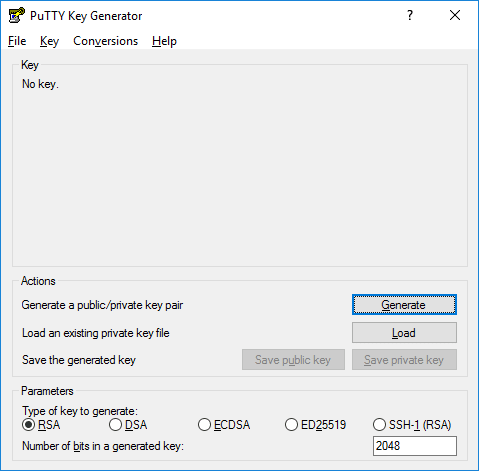
Generating a key pair:
- Under ‘Parameters’, you must first select the type of key pair to be generated (‘Type of key to generate’) - select ‘RSA’ here
- Next, specify the number of bits for the key (Number of bits in a generated key); the higher the value, the more secure the key will be This is selected in increments of 1024
- Select, for example, 2048, 3072 or 4096
- Then click on the “Generate” button
- The key is generated by a random number generator; to do this, move the mouse cursor over the grey area until the bar is completely filled
Complete the key pair setup:
- In the first field, ‘Key comment’, you can give the key pair a name so that it can be clearly assigned to a specific user; this is particularly helpful if you wish to store or manage multiple SSH keys on the server
- In the next field, ‘Key passphrase’, you can enter a passphrase, which must be provided when using the key. This enhances the security of the SSH key and protects it from misuse should it be lost. If you enter one, you must then repeat it in the next field, ‘Confirm’, to confirm it
- Now select “Save public key” and save the file (your public key) in a location of your choice with the .txt extension so that you can easily open it with a text editor
- This key is required by the server you wish to authenticate with in order to validate your private key. You will need this subsequently to set up access to the server.
- Next, select “Save private key” and save the file (your private key) in a location of your choice with the .ppk extension
- The private key is required by PuTTY or your preferred SSH client to authenticate with the server.
- You can then close PuTTYgen.
Storing SSH keys in PuTTY
Deploying SSH keys on the web server
SSH public-key authentication - adding an SSH key